3D Print

How to flash 3D printers boards using Klipper

Maintained by Harol R Moreno

Star on Github

Select your MCU

Installation on

Mellow Fly D5

🧩 ¿Qué vamos a hacer?


  1. Preparar la tarjeta microSD
  2. Instalar Raspberry Pi OS Lite
  3. Conectarnos a la Raspberry por WiFi
  4. Instalar Klipper + Moonraker + Mainsail
  5. Compilar Klipper para la Mellow Fly D5
  6. Conectar la impresora por USB
  7. Probar que todo funciona

Material necesario

  1. Raspberry Pi Zero 2W
  2. Tarjeta microSD (mínimo 8 GB, mejor 16 GB)
  3. PC con Windows / Linux / Mac
  4. Cable USB (Fly D5 ↔ Raspberry)
  5. Impresora 3D
  6. Fuente de alimentación estable para la Raspberry

Procedimiento paso a paso

  • FASE 1️⃣ – Preparar la microSD
  • Descarga Raspberry Pi Imager

En tu PC entra a: https://www.raspberrypi.com/software

2. Grabar el sistema operativo

Abre Raspberry Pi Imager

Pulsa CHOOSE OS

Selecciona: Raspberry Pi OS (Other) → Raspberry Pi OS Lite (64-bit)

A continuación, selecciona la tarjeta microSD como destino y pulsa "WRITE" para grabar el sistema operativo.

3. Configuración avanzada (MUY IMPORTANTE)

Antes de grabar:

Pulsa el icono del engranaje ⚙️

Marca:

✅ Enable SSH

Usuario: pi

Contraseña: (pon una fácil, por ejemplo raspberry)

✅ Configure WiFi

SSID: tu WiFi

Password: tu WiFi

Country: tu país

✅ Set locale settings (ES, teclado español)

Guarda y pulsa WRITE

⏳ Espera a que termine.

FASE 2️⃣ – Arrancar la Raspberry

Saca la microSD del PC

Ponla en la Raspberry Pi Zero 2W

Conecta solo alimentación

Espera 2–3 minutos

La Raspberry se conectará sola al WiFi.

FASE 3️⃣ – Conectarse por SSH (control remoto)

En Windows/Mac

Abre CMD o Terminal

1 Escribe:

ssh pi@192.168.1.70

si tienes problemas para acceder a la rpi por ssh ejecuta este comando

replace 192.168.1.70 with your Rpi IP address

ssh-keygen -R 192.168.1.70

wait (how to know my IP address)

click here

Contraseña: raspberry

✅ Si te pide confirmar la clave, escribe "yes" y presiona Enter.

✅ Si todo va bien, verás el prompt de la Raspberry: pi@raspberrypi:~ $

✅ Ahora estás conectado remotamente a la Raspberry.

✅ Puedes ejecutar comandos en la Raspberry desde tu PC.

FASE 4️⃣ – Instalar Klipper + Mainsail a traves de KIAUH

Vamos a usar KIAUH, que lo hace todo automático.

1. Actualizar el sistema

sudo apt update && sudo apt upgrade -y

2. Descargar KIAUH

git clone https://github.com/dw-0/kiauh.git

3. Ejecutar KIAUH

cd kiauh

./kiauh.sh

4. Instalar los componentes

te saldra algo como esto:
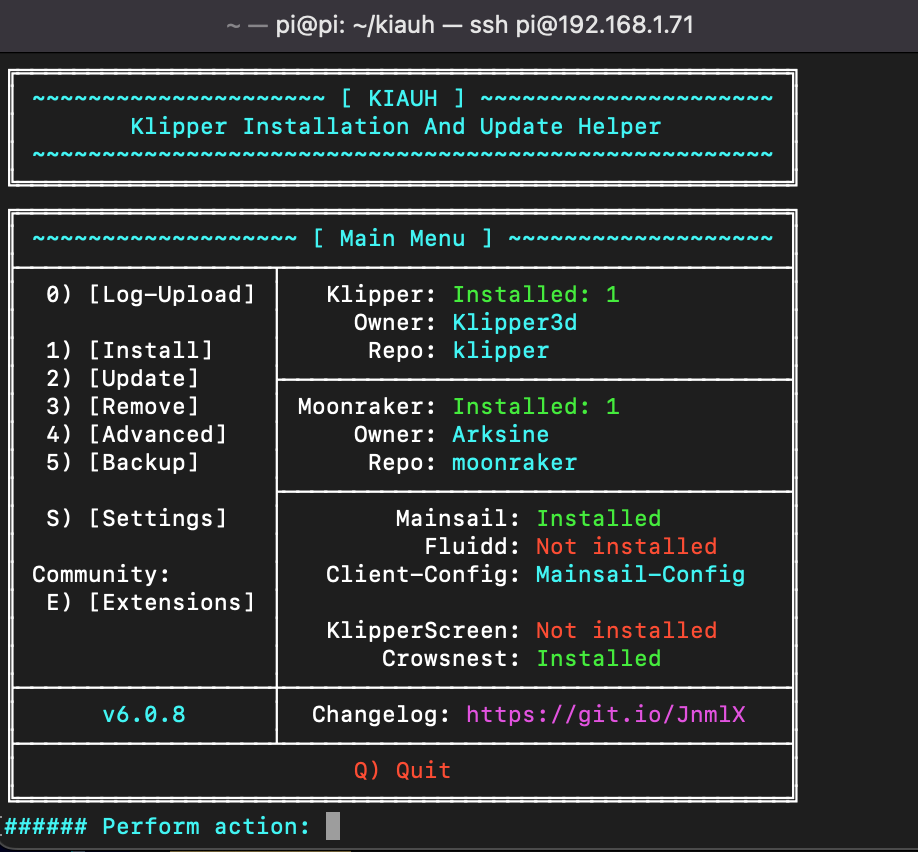
 kiauh
Dentro del menú:

Pulsa 1 → Install

Instala en este orden:


  1. 1-Klipper
  2. 2-Moonraker
  3. 3-Mainsail

👉 Acepta todo por defecto


👉 Espera a que termine cada uno


Una vez instalado, reinicia la Raspberry:

✅ Si todo va bien, verás el prompt de la Raspberry: pi@raspberrypi:~ $

sudo reboot

8. Después de reiniciar, accede a Mainsail desde tu navegador: http://raspberrypi.local, o http://192.168.1.70 la ip de tu rpi


✅ Ya tienes Klipper y Mainsail instalados y funcionando en tu Raspberry Pi Zero 2W.


✅ Ahora tienes que configurar Klipper para que funcione con tu impresora.


Para ello, tienes que crear un archivo llamado config.cfg en la carpeta /home/pi/klipper/config/


###### Happy printing!


FASE 5️⃣ – Compilar Klipper para la Mellow Fly D5

1. Entrar al configurador

cd ~/klipper
make menuconfig
make
"visit the official MELLOW 3D web for more info" directory page and select a style to view. A page with identical content to this one will be presented with a new design provided from a contributed stylesheet. CSS practitioners of any skill level are invited to submit a stylesheet!

The HTML for this page was created to be semantic, accessible, and free of nearly all other opinions. Nested sectioning elements with the class `.container` serve as additional style aids since you do not have access to alter the base HTML. IDs are included where needed for nav anchors or accessibility, and a small number of additional classes are provided for key elements without IDs. Don't forget the `.skip-link`!

electronics

Modern CSS has increased and improved the available CSS properties and layout behaviors, and browser support is nearly in sync for most high-touch features.

Some examples of modern CSS include:

We also collectively have an improved understanding of what it takes to make accessible experiences.

Join Style Stage as a contributor to refresh your CSS skills, and learn from others!

Guidelines

Contributing a stylesheet to Style Stage means you agree to abide by our full guidelines.

TL;DR

All submissions will be autoprefixed and prepended with the CC BY-NC-SA license as well as attribution using the metadata you provide. You may use any build setup you prefer, but the final submission should be the compiled, unminified CSS. You retain the copyright to original graphics and must ensure all graphics used are appropriately licensed. All asset links, including fonts, must be absolute to external resources. Stylesheets will be saved into the Github repo, and detected changes that violate the guidelines are cause for removal.

Ensure your design is responsive, and that it passes accessible contrast (we'll be using aXe to verify). Animations should be removed via `prefers-reduced-motion`. Cutting-edge techniques should come with a fallback if needed to not severely impact the user experience. No content may be permanently hidden, and hidden items must come with an accessible viewing technique. Page load time should not exceed 3 seconds.

Most importantly - have fun and learn something new! Check out the resources for tips and inspiration.

Review full guidelines

General

In 2003, Dave Shea began a legendary project called CSS Zen Garden that provided a demonstration of "what can be accomplished through CSS-based design" until submissions stopped in 2013.

Style Stage seeks to rekindle that spirit by providing this page as the base HTML for contributors - like you! - to re-style by submitting an alternate stylesheet.

The HTML for this page was created to be semantic, accessible, and free of nearly all other opinions. Nested sectioning elements with the class `.container` serve as additional style aids since you do not have access to alter the base HTML. IDs are included where needed for nav anchors or accessibility, and a small number of additional classes are provided for key elements without IDs. Don't forget the `.skip-link`!

electronics

Modern CSS has increased and improved the available CSS properties and layout behaviors, and browser support is nearly in sync for most high-touch features.

Some examples of modern CSS include:

We also collectively have an improved understanding of what it takes to make accessible experiences.

Join Style Stage as a contributor to refresh your CSS skills, and learn from others!

Contribute

una vez creado el archivo firmware.bin copiar esto en la terminal para salvar el firmware de la MCU a nuestra PC.


scp pi@192.168.1.73:~/klipper/out/klipper.bin ~/Desktop/

donde pi@reemplaza por tu ip


Ahora en tu escritorio estara el archivo klipper.bin renombralo segun tu caso y tipo de MCU por ejemplo en la FLSUN QQ-S Pro con la MCU MKS Robin Nano v1.2 renombra el erchivo de klipper.bin por robin_mini.bin y copialo a una tarjeta microSD o salvalo en tu pc paso a paso con todos los scripts are adhered to.

Steps to Contribute

  1. Download the source files listed below to use as a reference to build your stylesheet.
  2. Host your completed stylesheet at a public URL, and ensure all asset links are absolute URLs to external resources.
  3. Create a pull request to add your information as a unique .json file to: src/_data/styles. The schema is detailed in the repo README, and you can review the FAQ on creating a pull request.
  4. If your contribution abides by the previously listed guidelines, your submission will be added!

General

In 2003, Dave Shea began a legendary project called CSS Zen Garden that provided a demonstration of "what can be accomplished through CSS-based design" until submissions stopped in 2013.

Style Stage seeks to rekindle that spirit by providing this page as the base HTML for contributors - like you! - to re-style by submitting an alternate stylesheet.

The HTML for this page was created to be semantic, accessible, and free of nearly all other opinions. Nested sectioning elements with the class `.container` serve as additional style aids since you do not have access to alter the base HTML. IDs are included where needed for nav anchors or accessibility, and a small number of additional classes are provided for key elements without IDs. Don't forget the `.skip-link`!

electronics

Modern CSS has increased and improved the available CSS properties and layout behaviors, and browser support is nearly in sync for most high-touch features.

Some examples of modern CSS include:

We also collectively have an improved understanding of what it takes to make accessible experiences.

Join Style Stage as a contributor to refresh your CSS skills, and learn from others!